Table of Contents
Branching is one of Git’s key concepts, enabling one to work on a particular feature without affecting code elsewhere. This means developers can make changes safely, then choose to either discard them or merge them with the rest of the project.
If you work with Git, you’ve probably created branches many times, but there are several ways to do it. Being aware of these different methods and their advantages can help you work with Git more effectively.
How and when you create branches is a key part of having a defined workflow, which is essential to maintaining your Git repository. If you have too many, or you don’t create them at the right point, your project can become a mess. This is why your branching strategy matters.
In this article, you’ll learn more about Git’s data model and how to create branches using the command line, the GitHub online interface, or orphan branches, as well as the advantages of each method.
Git Logs and Data Model
Git keeps track of all the changes you make to your code. The commits you make form a continuous history of your project, which can be examined and revisited. That allows you to check a previous stage of development to see the changes that were made.
You can view the commit history by typing:
git log
That will show all your commits. You can shorten it by adding the number of commits you wish to see as a parameter. To view the last ten commits, for example, type:
git log -10
The DAG
Git uses objects and references to build a log of changes you make to your repository. These all flow in the same direction and can be visualized as a directed acyclic graph, or DAG.
Objects include the specific commits, the trees that refer to objects, and the blob files describing your files. References include branches and tags, which both refer to commits.
Here is a simple command-line representation of the DAG you can use:
git log --graph --decorate --oneline
Other tools can produce visualizations for you, such as GitKraken. As your repo gets complicated, having a visual overview of where you are and where you’ve been can help you figure out your next moves.
The Git Branch Command
The command line is the most common way to work with Git. New branches are usually based on an existing one, except in the case of orphan branches (more on that later).
To create a new branch, open the command line, which will be Bash on the Mac and Linux or the command prompt on Windows. Navigate to the folder your repo is in before starting.
This is the easiest way to do it:
git checkout -b <branchname>
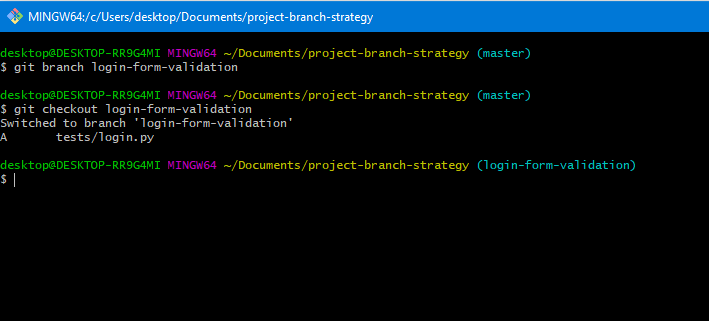
That creates the branch and switches straight to it. If you don’t want to switch to it, run:
git branch <branchname>
and switch to the new branch later with:
git checkout <branchname>
This method is straightforward with no real disadvantages. If you’re using it locally, though, your changes will not be visible to others until you push to the remote branch, so your version of the repo could diverge from the master copy if you wait too long before updating it.
If you want to create a branch based on an existing one, type:
git checkout -b <new_branchname> <existing_branchname>
You can also create branches based on specific tags or commits. To use a tag, type:
git checkout -b <branchname> <tagname>
Or for a commit via:
git checkout -b <branchname> <symbolic_reference>
where symbolic_reference is replaced by something like HEAD~3, or a reference to the commit you want to branch from.
For more about branching in the command line, check out the Git documentation.
The GitHub Online Interface
GitHub allows you to perform most common tasks on its site via its web interface. To create a new branch, go to the project page. You’ll see the branch you’re currently in listed at the top left—usually master or main.
If you click it, it will expand and you’ll see a text field. There will also be a list of existing branches, which will just be the one branch before you create others.
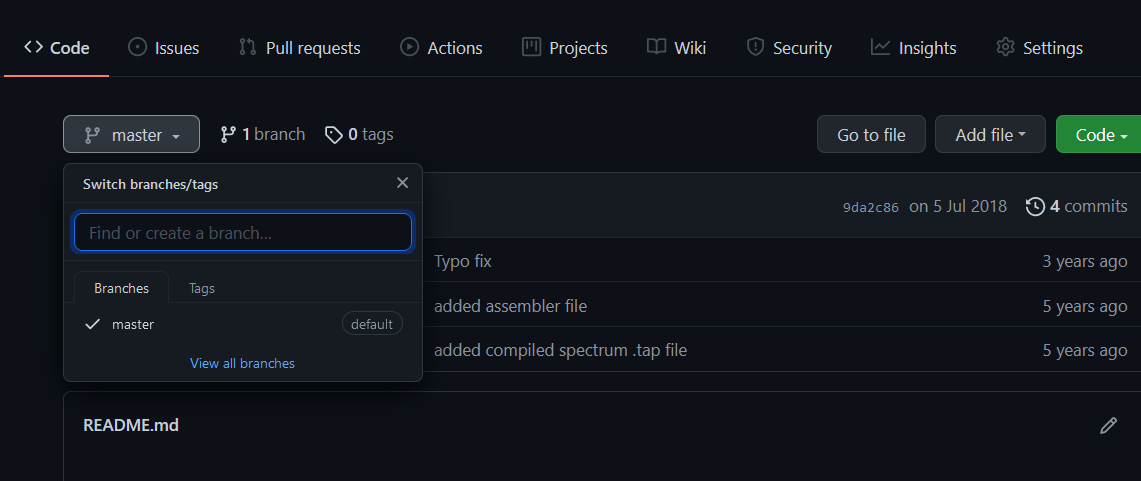
Type the new branch’s name into the text field. You’ll see text below describing what will happen, such as “Create branch: foo from main.” Press Return.
If you want to branch from a specific existing branch, just switch to it before creating the new one.
You can also create branches from specific elements, such as commits or tags. If you click the Tags tab next to the list of branches, you’ll see a list of available tags to use.
GitHub’s site is fast, convenient, and user-friendly, making it a good choice for users not yet comfortable with the command line. It presents you with a lot of information at a glance, so you can easily see your options.
If you’re new to Git, this is a helpful way to get started. Creating a dummy project lets you experiment without pain.
Orphan Branches
Sometimes you want to share a branch with someone but don’t want them to see the entire project history. A new orphan branch is the answer, because it’s created from scratch with no commit history.
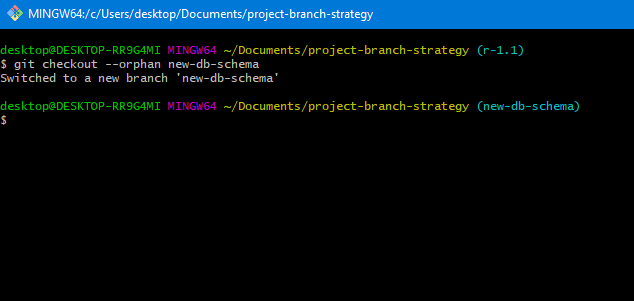
Create it using:
git checkout --orphan <branchname>
This is also useful if you want to work independently, or if you want to reset things and work on a clean branch. Perhaps you’re happy with the previous history of the project and want to create a new log that begins from here.
Other uses of orphan branches include combining multiple repos, setting a separate documentation branch, or creating a branch for a static site.
Other Git Branching Options
There are other ways to control Git. GitHub has apps for desktop and mobile. These include all the features you’d expect and allow you to browse the commit history. You also get useful code diffs showing you at a glance what’s been added. Browsing your team’s code in this way can help you keep track of everyone’s work.
Other sites such as GitLab let you work with Git from a web-based interface. Since GitHub’s acquisition by Microsoft, these have surged in popularity and offer good alternatives to the larger platform.
Many IDEs have Git support, too, allowing you to perform branch operations. NetBeans, along with its many derivatives, also supports Git. If your IDE doesn’t support Git directly, it may have a plugin that does.
Which Branching Strategy to Use
Now you know how to create branches, consider when to do so in order to maximize your flow strategy.
Git flow is an early strategy involving several branches for specific purposes. It works well with traditional release models, allowing you to organize work on features and bring them together for specific releases.
GitHub flow is a modern alternative that aims to simplify things using feature-specific branches that are deleted after merging. It is great for small teams wanting to compartmentalize their work without introducing too much complexity. It can get messy as your team grows, however.
GitLab flow aims to give you the best of both worlds, with less complexity than Git flow but enough branches to handle situations GitHub flow doesn’t manage well. For larger projects, the additional release branches and optional staging and production branches help you to manage things effectively.
Which is best for you depends on the size of your team and the general workflows you have in place.
Conclusion
Branches are a powerful feature. Knowing how and in which situations to create them lets you more safely distribute work among your team. Enabling everyone to work together more cohesively makes your repo structure more consistent and your project easier to work with. Using a specific branching strategy as part of a defined Git workflow will also optimize the use of your repo.
If you do need help with Git, Rewind, formerly known as BackHub, can help keep your data safe and restore your repositories quickly. It’s a reliable, affordable way to guarantee the safety and availability of your code. Daily automatic backups provide granular restore capabilities, including metadata like commits, tags, and more.
 James Konik">