As your team grows, you may need to modify how you use Git to collaborate with team members. For instance, you might set up custom rules and a workflow for your repository and limit the users who can access it. You can automate these types of tasks using the Bitbucket API.
This article will demonstrate how to use Bitbucket to set up authentication, manage users and teams, create working repos, and use webhooks.
What Is Bitbucket?
Bitbucket is a Git repository management solution designed for professional teams. It hosts your local Git repositories and allows you to collaborate with other team members. Here are some other features:
- Access Control: You can set repository permissions, allowing only certain people to read or write in the repo.
- Workflow Control: You can allow only certain people to approve pull requests (PRs) or merge to master.
- Jira Integration: You can link your Jira tasks to your PRs, automatically close your tasks once the PR is merged, and track the status of your PR (in-progress, approved, or merged).
Using Bitbucket
There are two versions of the Bitbucket API. Version 1.0 was deprecated in June 2018. For this tutorial, you’ll be using version 2.0.
Prerequisites
Before you begin, make sure you have the prerequisites.
- Use JavaScript for the code.
- Install Node.js, which you can download here.
- Use the ExpressJS Framework to build a server. You don’t necessarily need previous experience with Express, but it is helpful.
- Be familiar with Git concepts.
- Sign up for a Bitbucket account here.
Authenticating and Security
There are several methods you can use to authenticate yourself.
Scopes
All the Bitbucket API endpoints require a scope to be passed. A scope is a string passed while making a request or during authentication. It applies privileges to the request. By default a scope provides read-only permission, so you will have to append `:write` to provide write permissions. Some scopes also have admin permissions, which can be added by appending `:admin`. You don’t need to add both read and write permissions; write permission gives you read permission as well.
Here are some of the available scopes:
Repository
A `repository` scope lets you access the source code repo, download files, view the wiki, or view issues raised for the repository, among other actions. You will need write permission to fork repos or push code to the repo.
There is a separate admin scope, `repository:admin`, which doesn’t include read/write scopes. An admin scope will allow you to view or edit repo permissions, wikis, reviewers, and webhooks. It will also let you delete the repo.
Snippets
A `snippet` scope will let you view/create snippets. To edit or delete existing snippets, you will need a scope of `snippet:write`.
Webhooks
A `webhooks` scope will let you view, edit, and create webhooks. There is no `:write` scope for webhooks.
Issue
An `issue` scope will let you view, create, watch, and vote on issues. To delete existing issues, you will need an `issue:write` scope.
There are other scopes related to pull requests, pipelines, accounts, and wiki. You can find more information here.
Be sure to only add the scopes for your add-on needs.
The other scopes supported by an API are listed here.
Basic Auth
For this type of authentication, you need a username and password. You can find your username here.
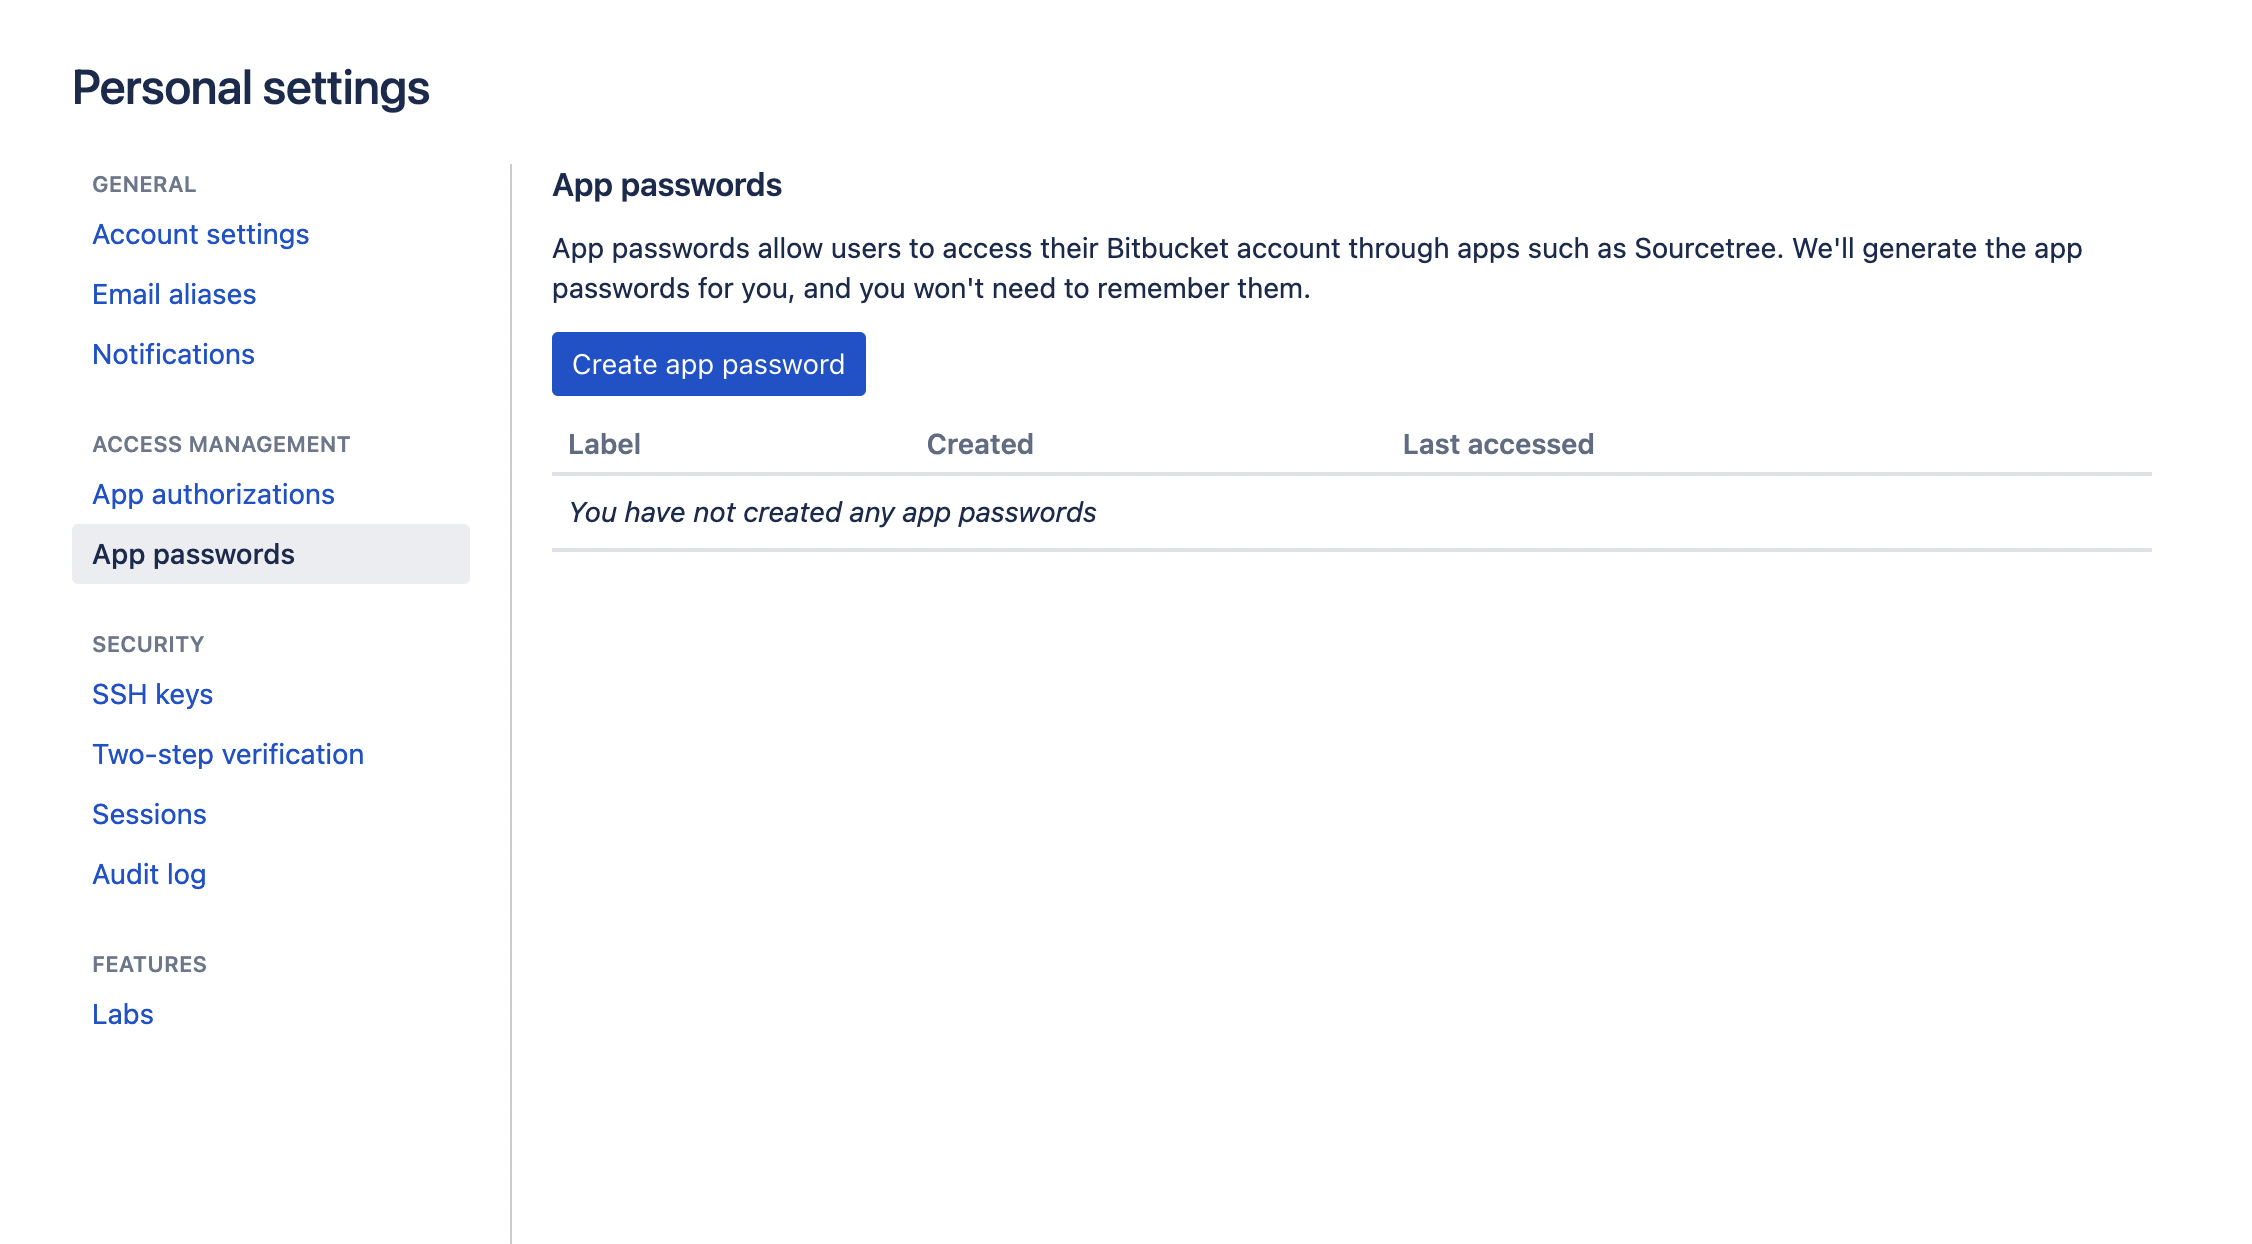
Create an app password here.
Now add the necessary scopes and permissions for the password.
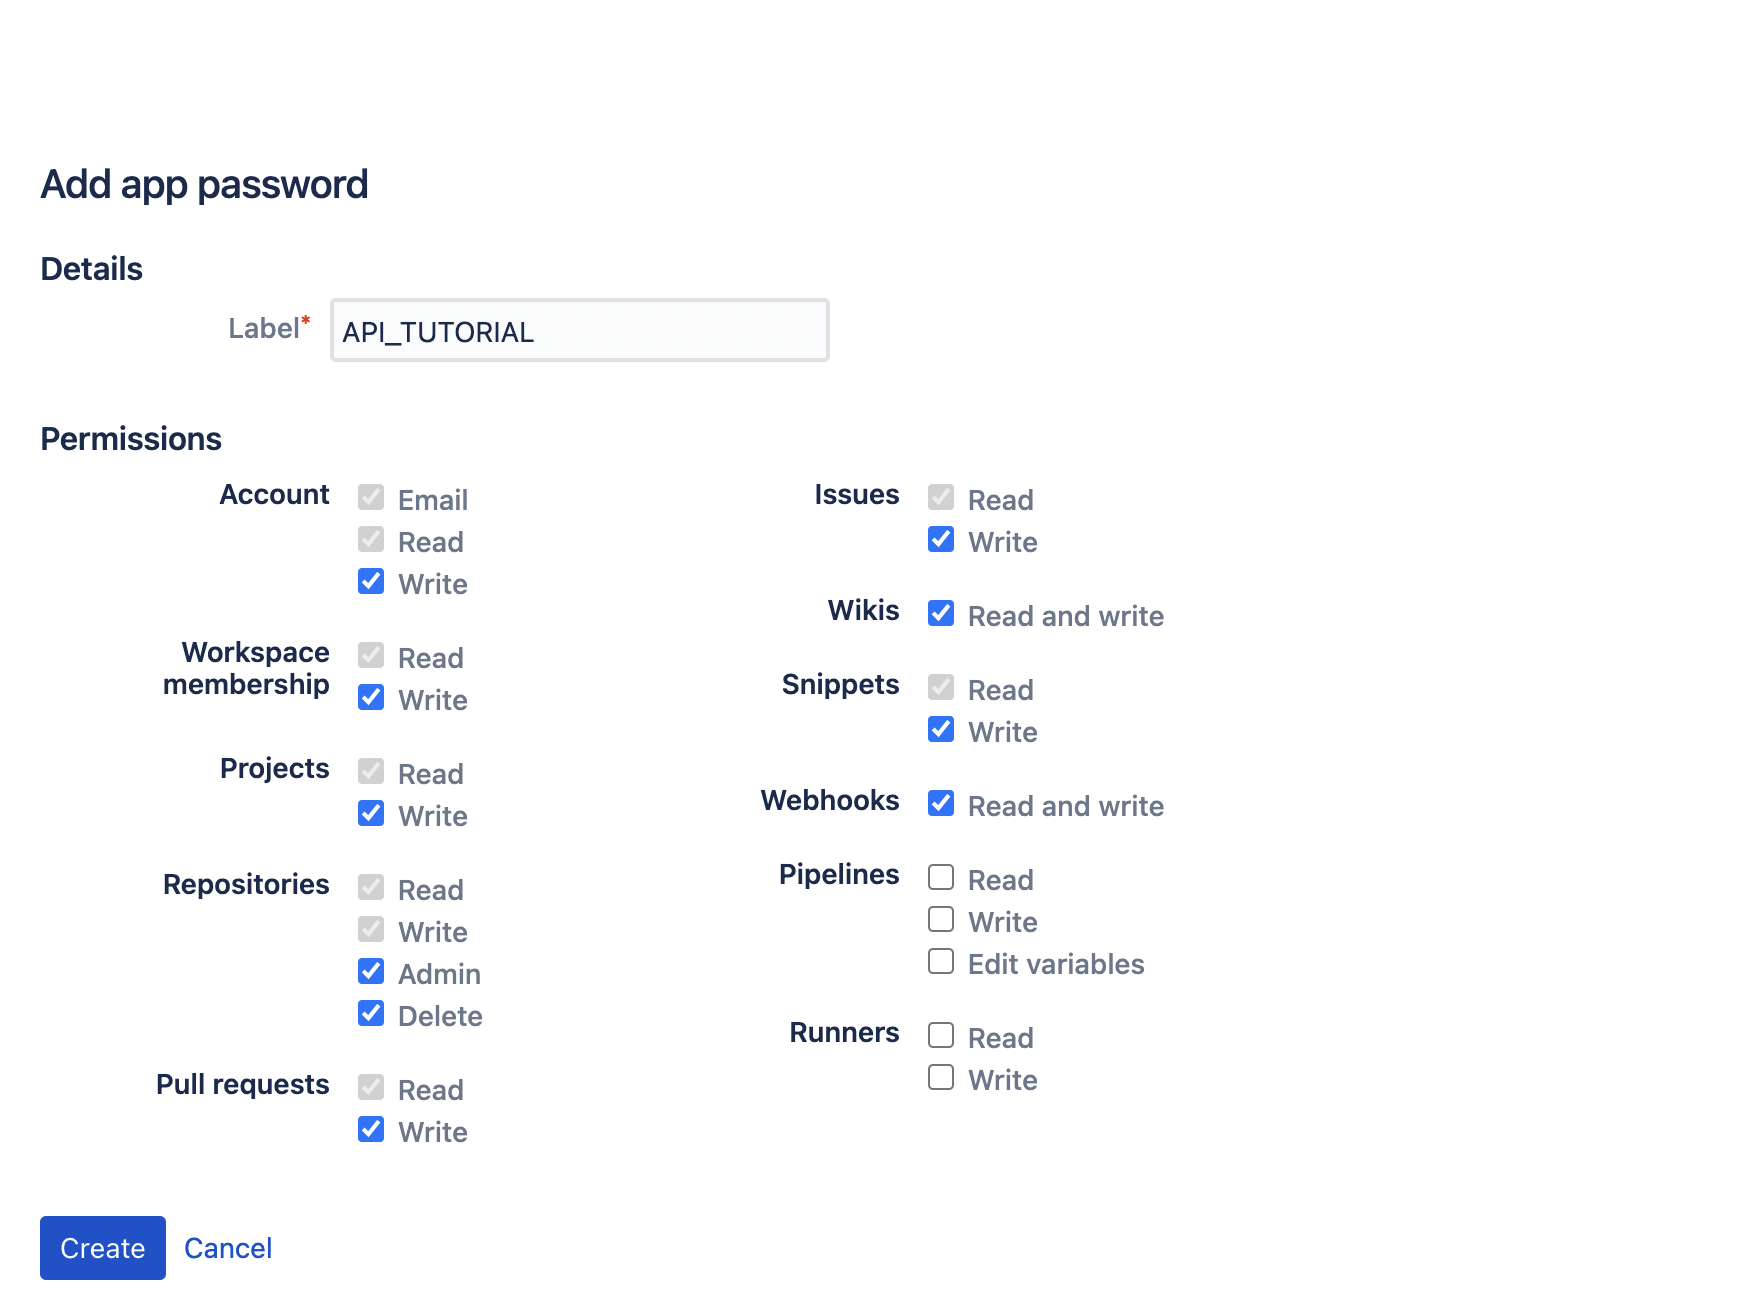
You can add the highest permissions for this tutorial. Depending on your use case, you could create individual passwords and adjust the scopes as needed.
Click on the Create button and copy the password. The password is only displayed once, so don’t forget to copy it.
You will store your credentials in an `.env` file. You can create environment variables as well.
- Create a file named `.
env`. - Add the following:
USER_NAME = YOUR_USER_NAME

PASSWORD = YOUR_APP_PASSWORD
- Replace the above with your credentials.
- Install the `
dotenv` package:
npm install dotenv
- Add the following code to read the credentials:
require("dotenv").config();

const  USER_NAME  =  process.env.USER_NAME;

const  PASSWORD  =  process.env.PASSWORD;
This code should be present in the file where you make the request to the API. You can also import through other files if needed.
- Install `
request` and `base64` to make the request to the API endpoint.
npm install request base-64
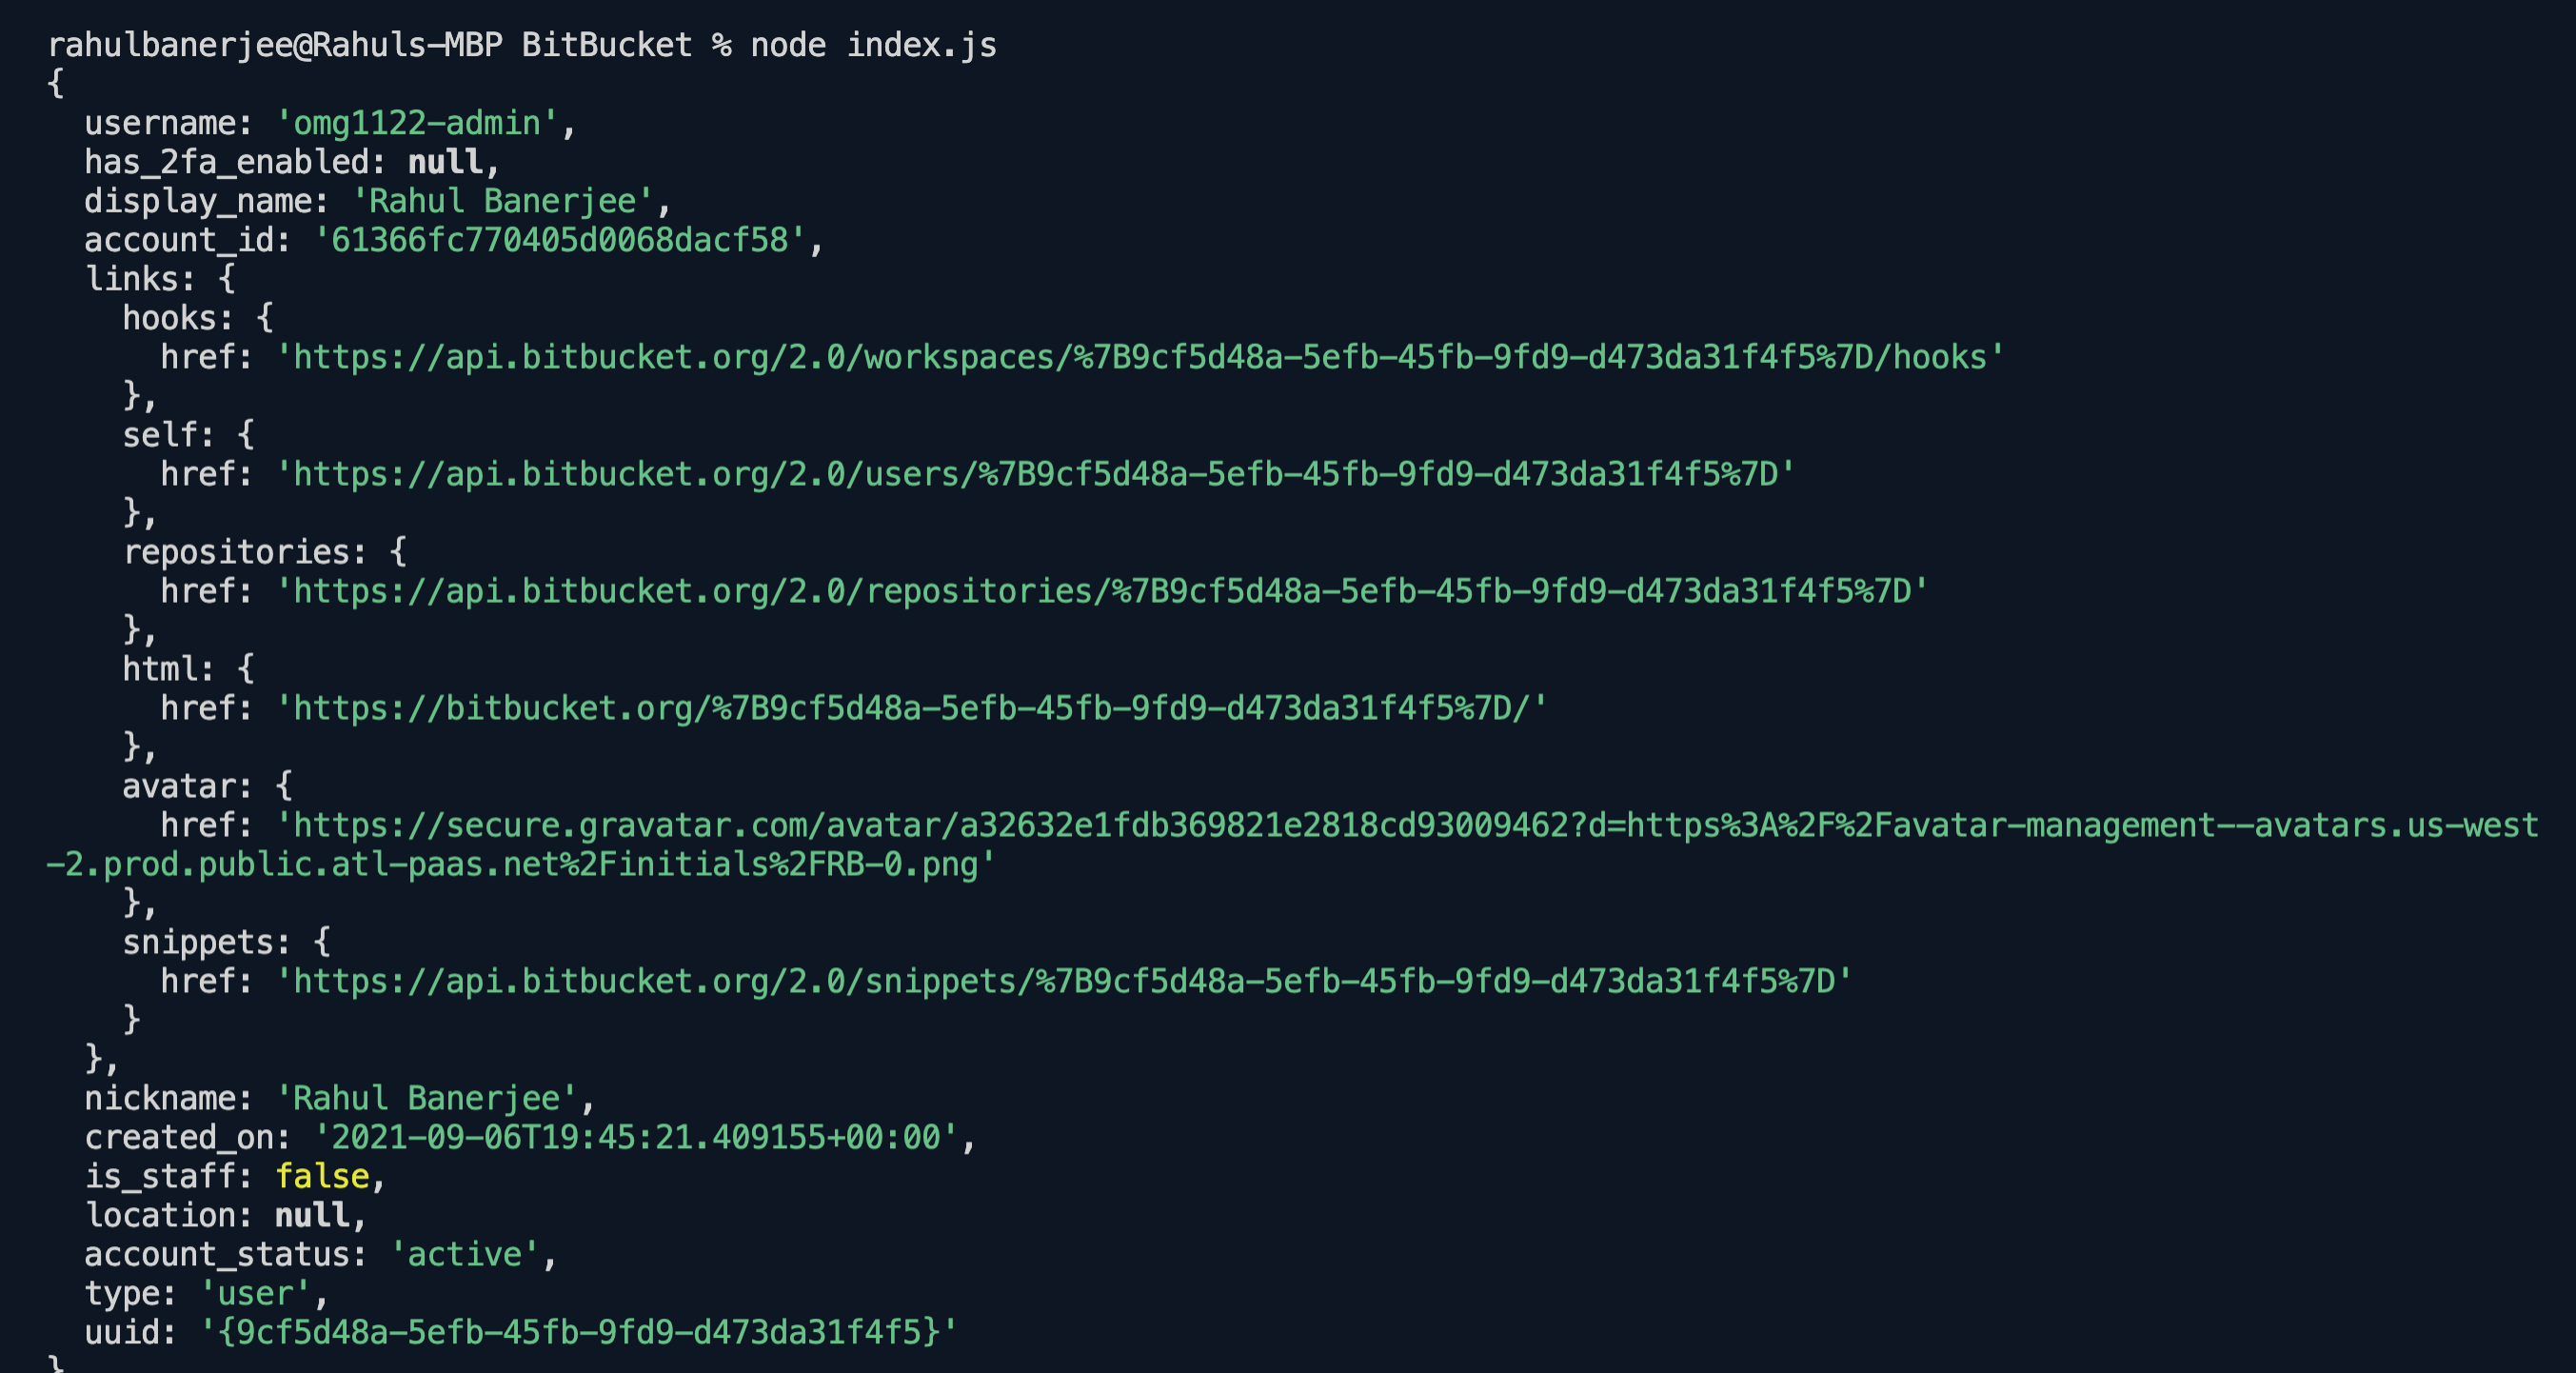
- Make a sample request to the user endpoint. This will return the information of the current logged-in user.
const request = require('request');

const base64 = require('base-64');

const URL_PREFIX = 'https://api.bitbucket.org/2.0';

const headers = {

    Authorization: 'Basic ' + base64.encode(USER_NAME +

        ':' + PASSWORD)

};

request.get(

    `${URL_PREFIX}/user`,

    {

        headers: headers

    },

    (err, res, body) => {

        console.log(JSON.parse(body));

    }

);
Once you have all the code in place, you can run the file. If your JavaScript file is named `index.js`, type the following in the terminal:
node index.js
The request returns an object. If the request is successful, the object should contain a key `status` with the value 200.
OAuth
The process changes when you use the OAuth 2.0 protocol.
- Create a workspace.

- Click on Settings.
- Click on OAuth consumers > Add consumer.
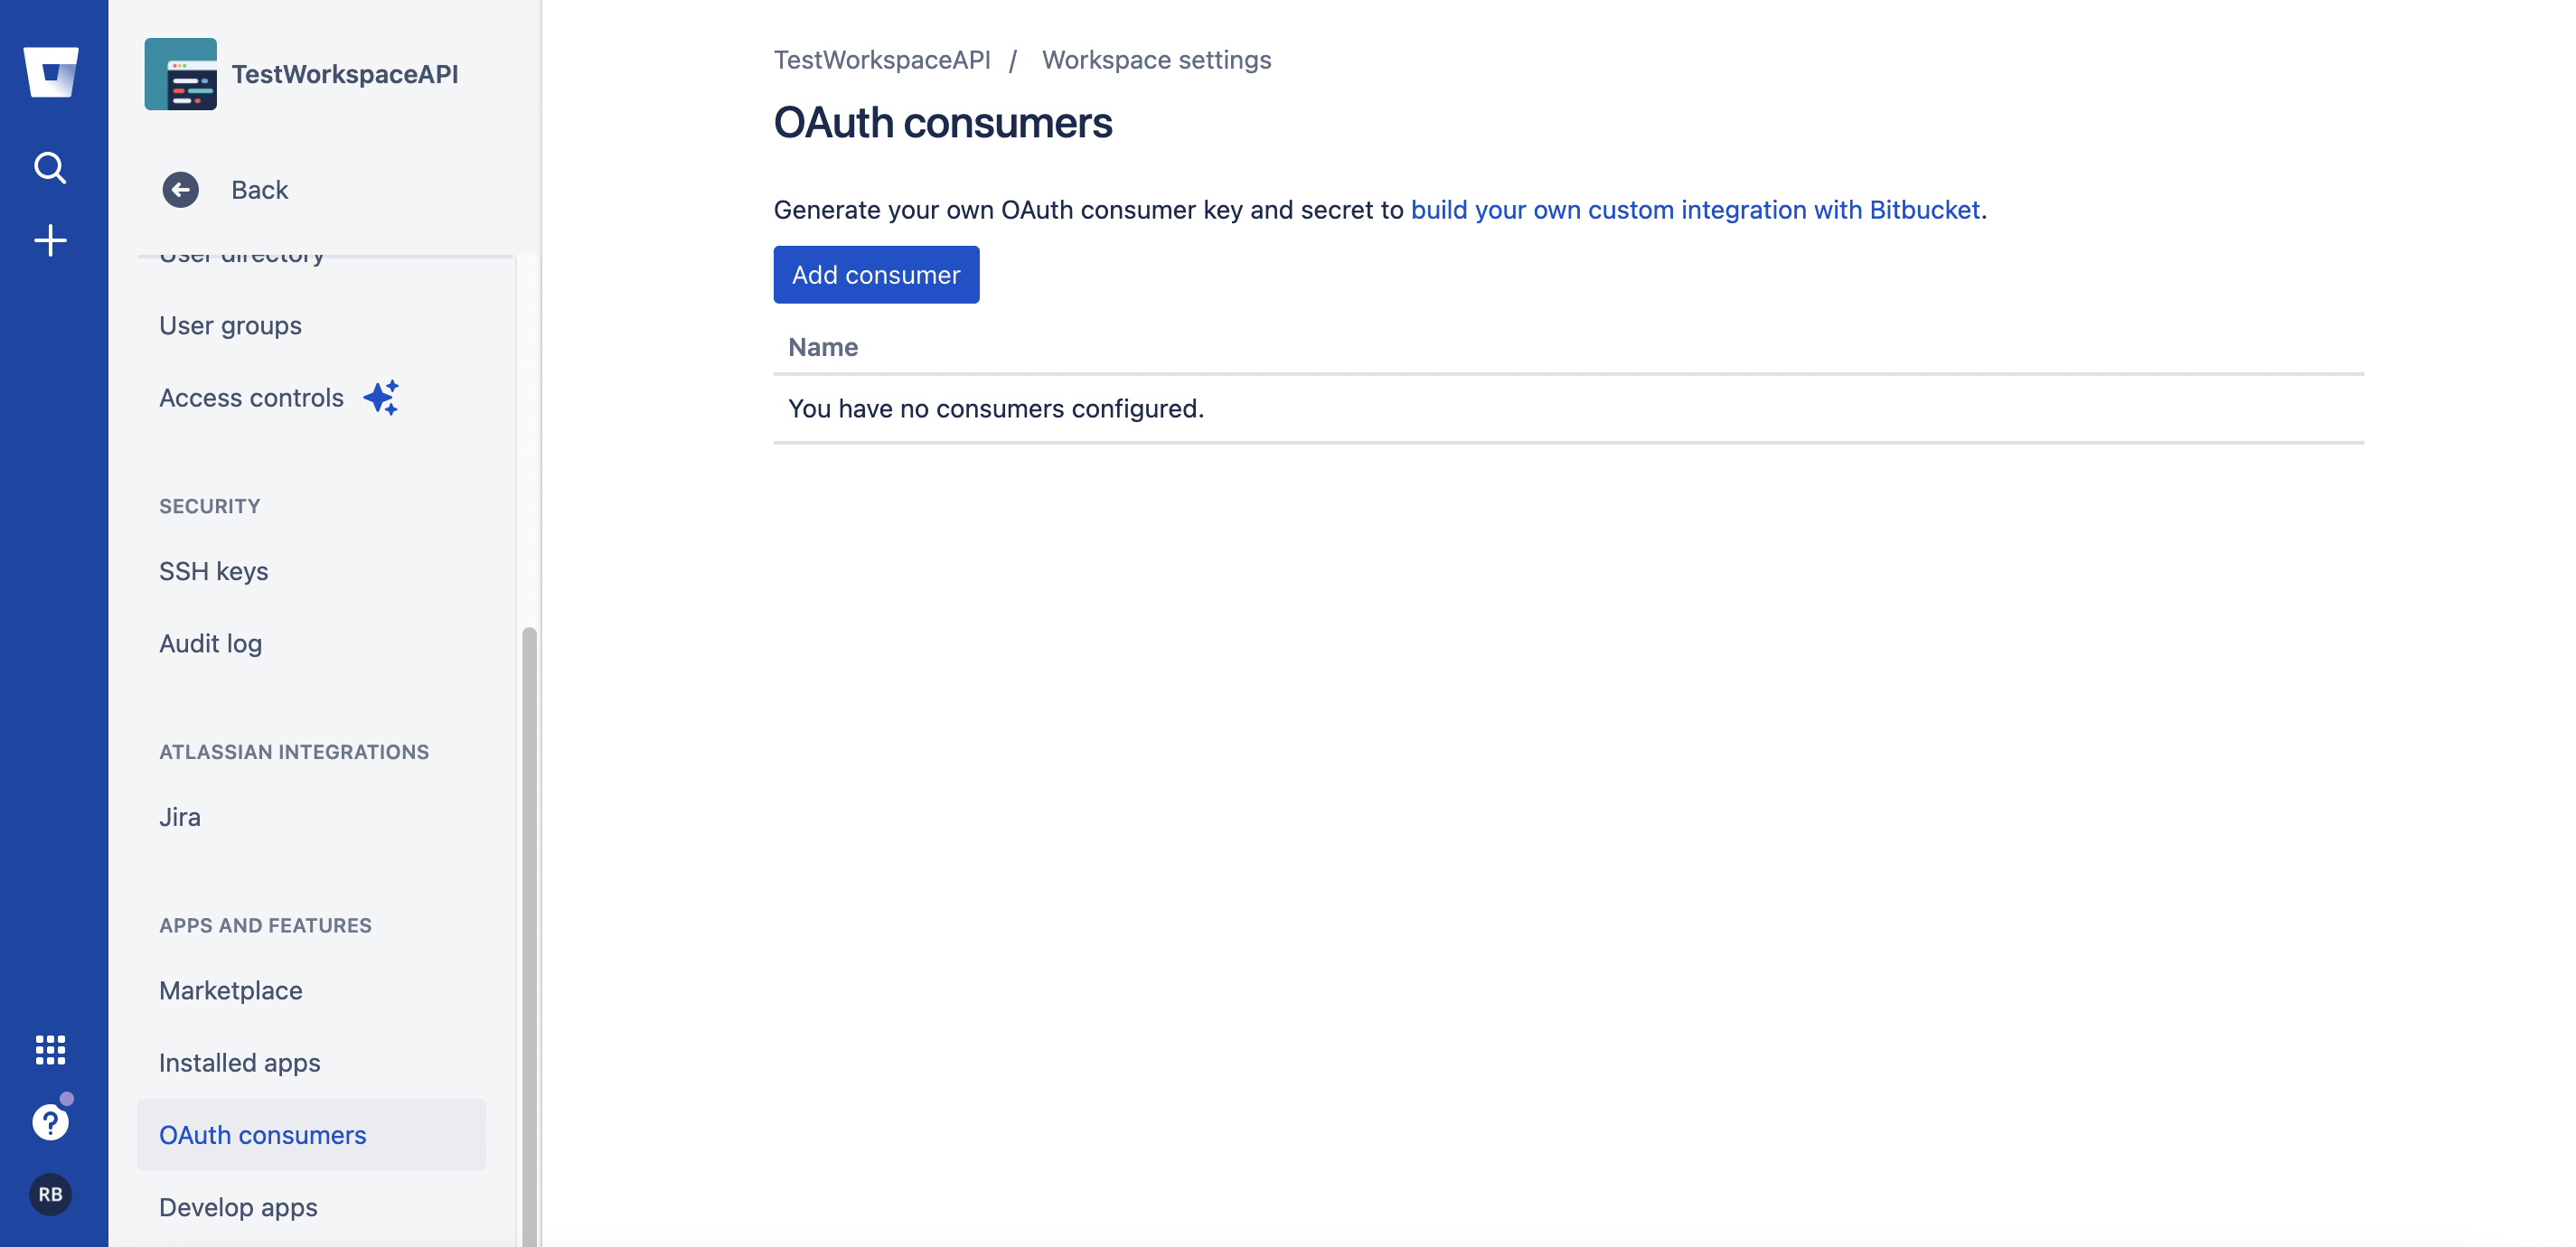
- You will need a callback URL. If you don’t have one, use the following:
https://httpbin.org/anything
- After you create a consumer, save the key.
- You will need to redirect the user to the following URL:
https://bitbucket.org/site/oauth2/authorize?client_id=

{client_id}&response_type=code
Replace `client_id` with the key you saved earlier. You should see the following screen:
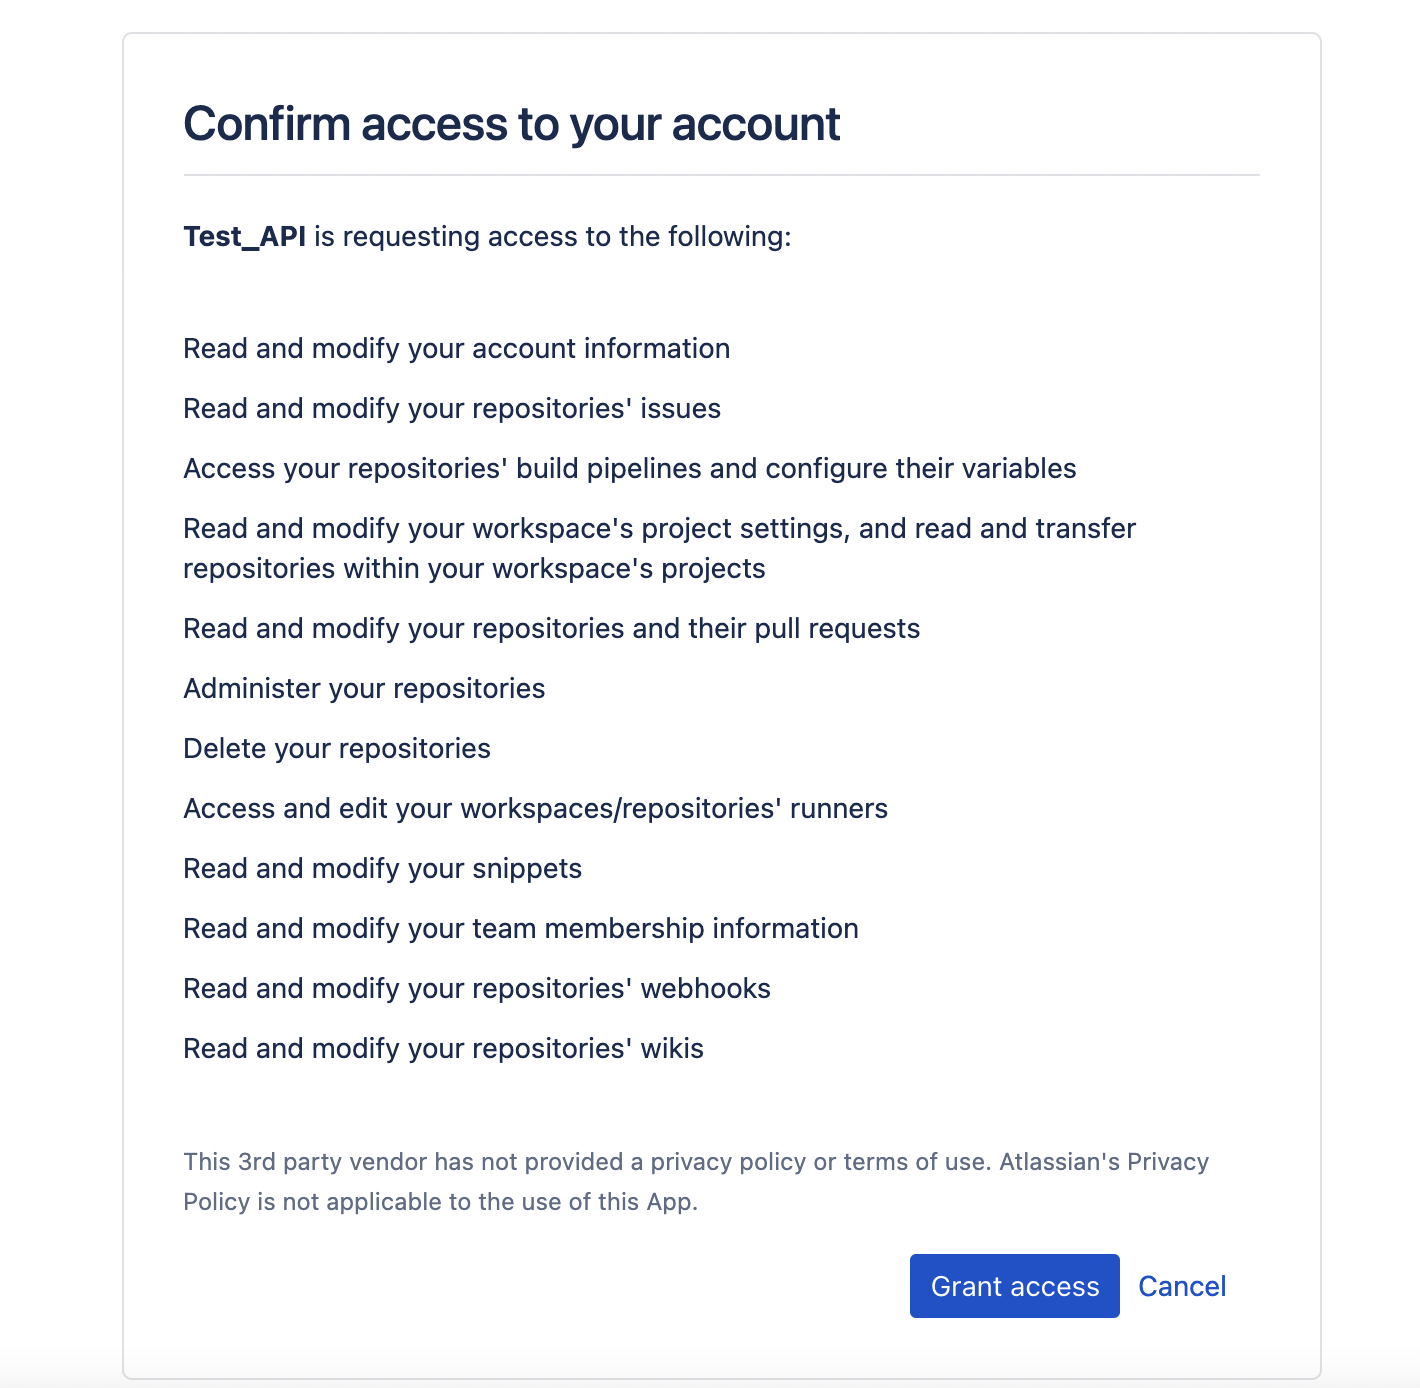
- After you click Grant access, an object with the access code will be returned.
- Exchange the access code for an access token:
request.post(

    {

        url: 'https://bitbucket.org/site/oauth2/access_token',

        headers: {

            Authorization: 'Basic ' + base64.encode(key + ':' +

                secret),

            'Content-Type': 'application/x-www-form-urlencoded'

        },

        form: { grant_type: 'authorization_code', code: code }

    },

    (err, res, body) => {

        console.log(JSON.parse(body).access_token);

    }

);
Replace the key with your key, the secret with your secret, and the code with your access code.
- The access token can be used to make requests:
request.get(

    `${URL_PREFIX}/user`,

    {

        headers: {

            Authorization: `Bearer ${access_token}`

        }

    },

    (err, res, body) => {

        console.log(JSON.parse(body))

    }

)
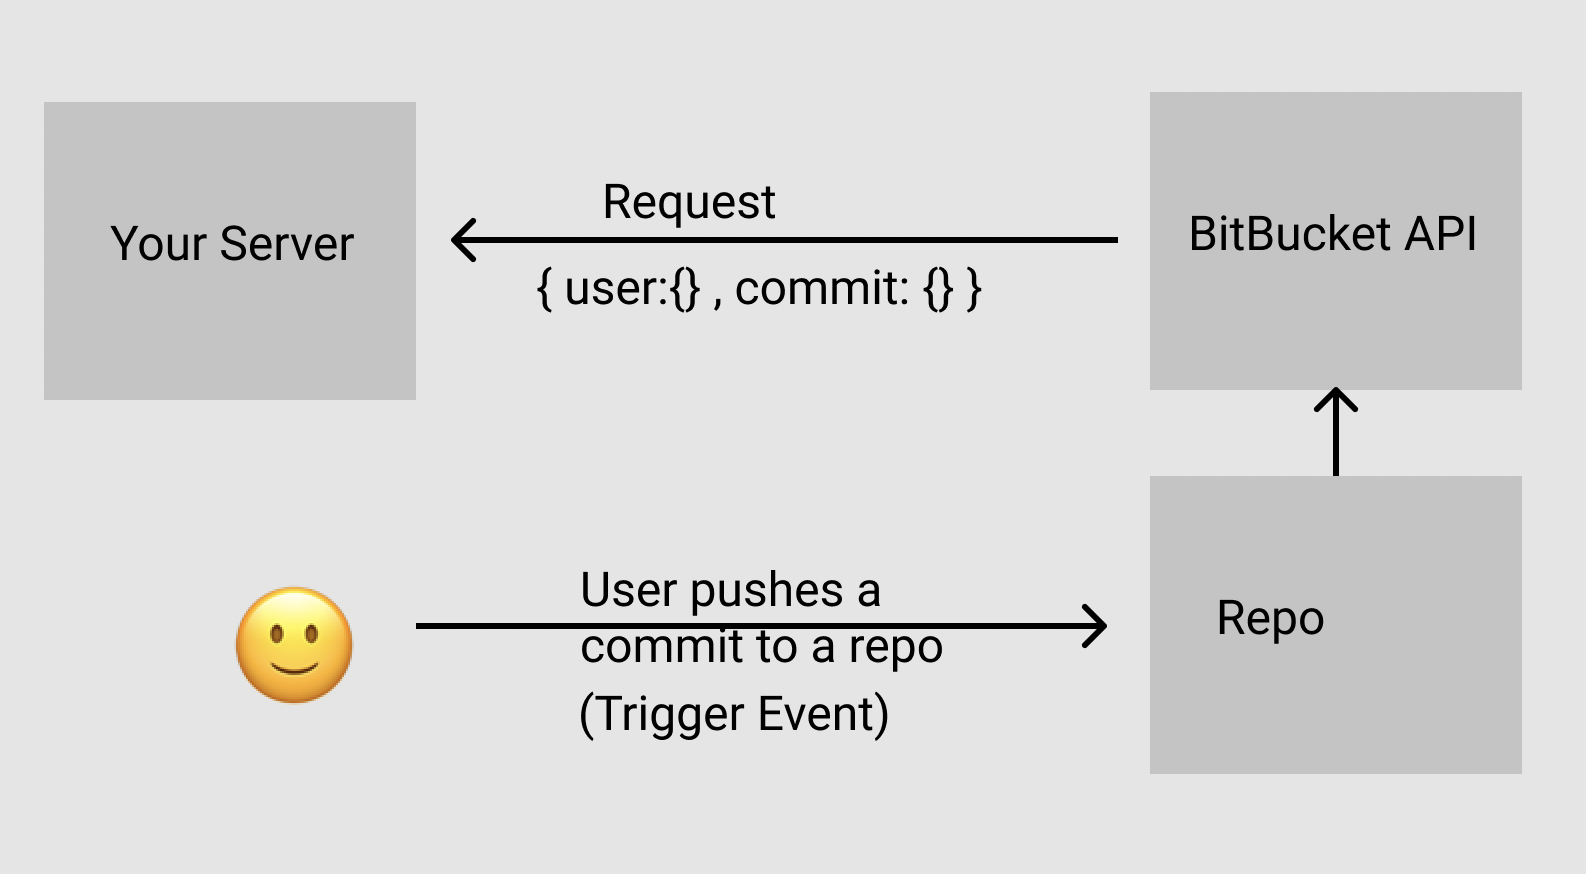
Webhooks
A webhook is a reverse API. Instead of making requests to an API, the API makes requests to your server when certain events are triggered. For example, when a user makes a commit to a repo on Bitbucket, a request containing the user and commit info is made to your server.
This image shows a sample webhook workflow:

To get a list of webhooks supported by Bitbucket, make a GET request:
`${URL_PREFIX}/hook_events/${type}`
`type` can be workspace, user, team, or repository. The request will return all the available webhook requests you can create.
Creating a Webhook in Bitbucket
Go to your repository.
.png)
Click on Repository Settings.
Next, click on Webhooks.
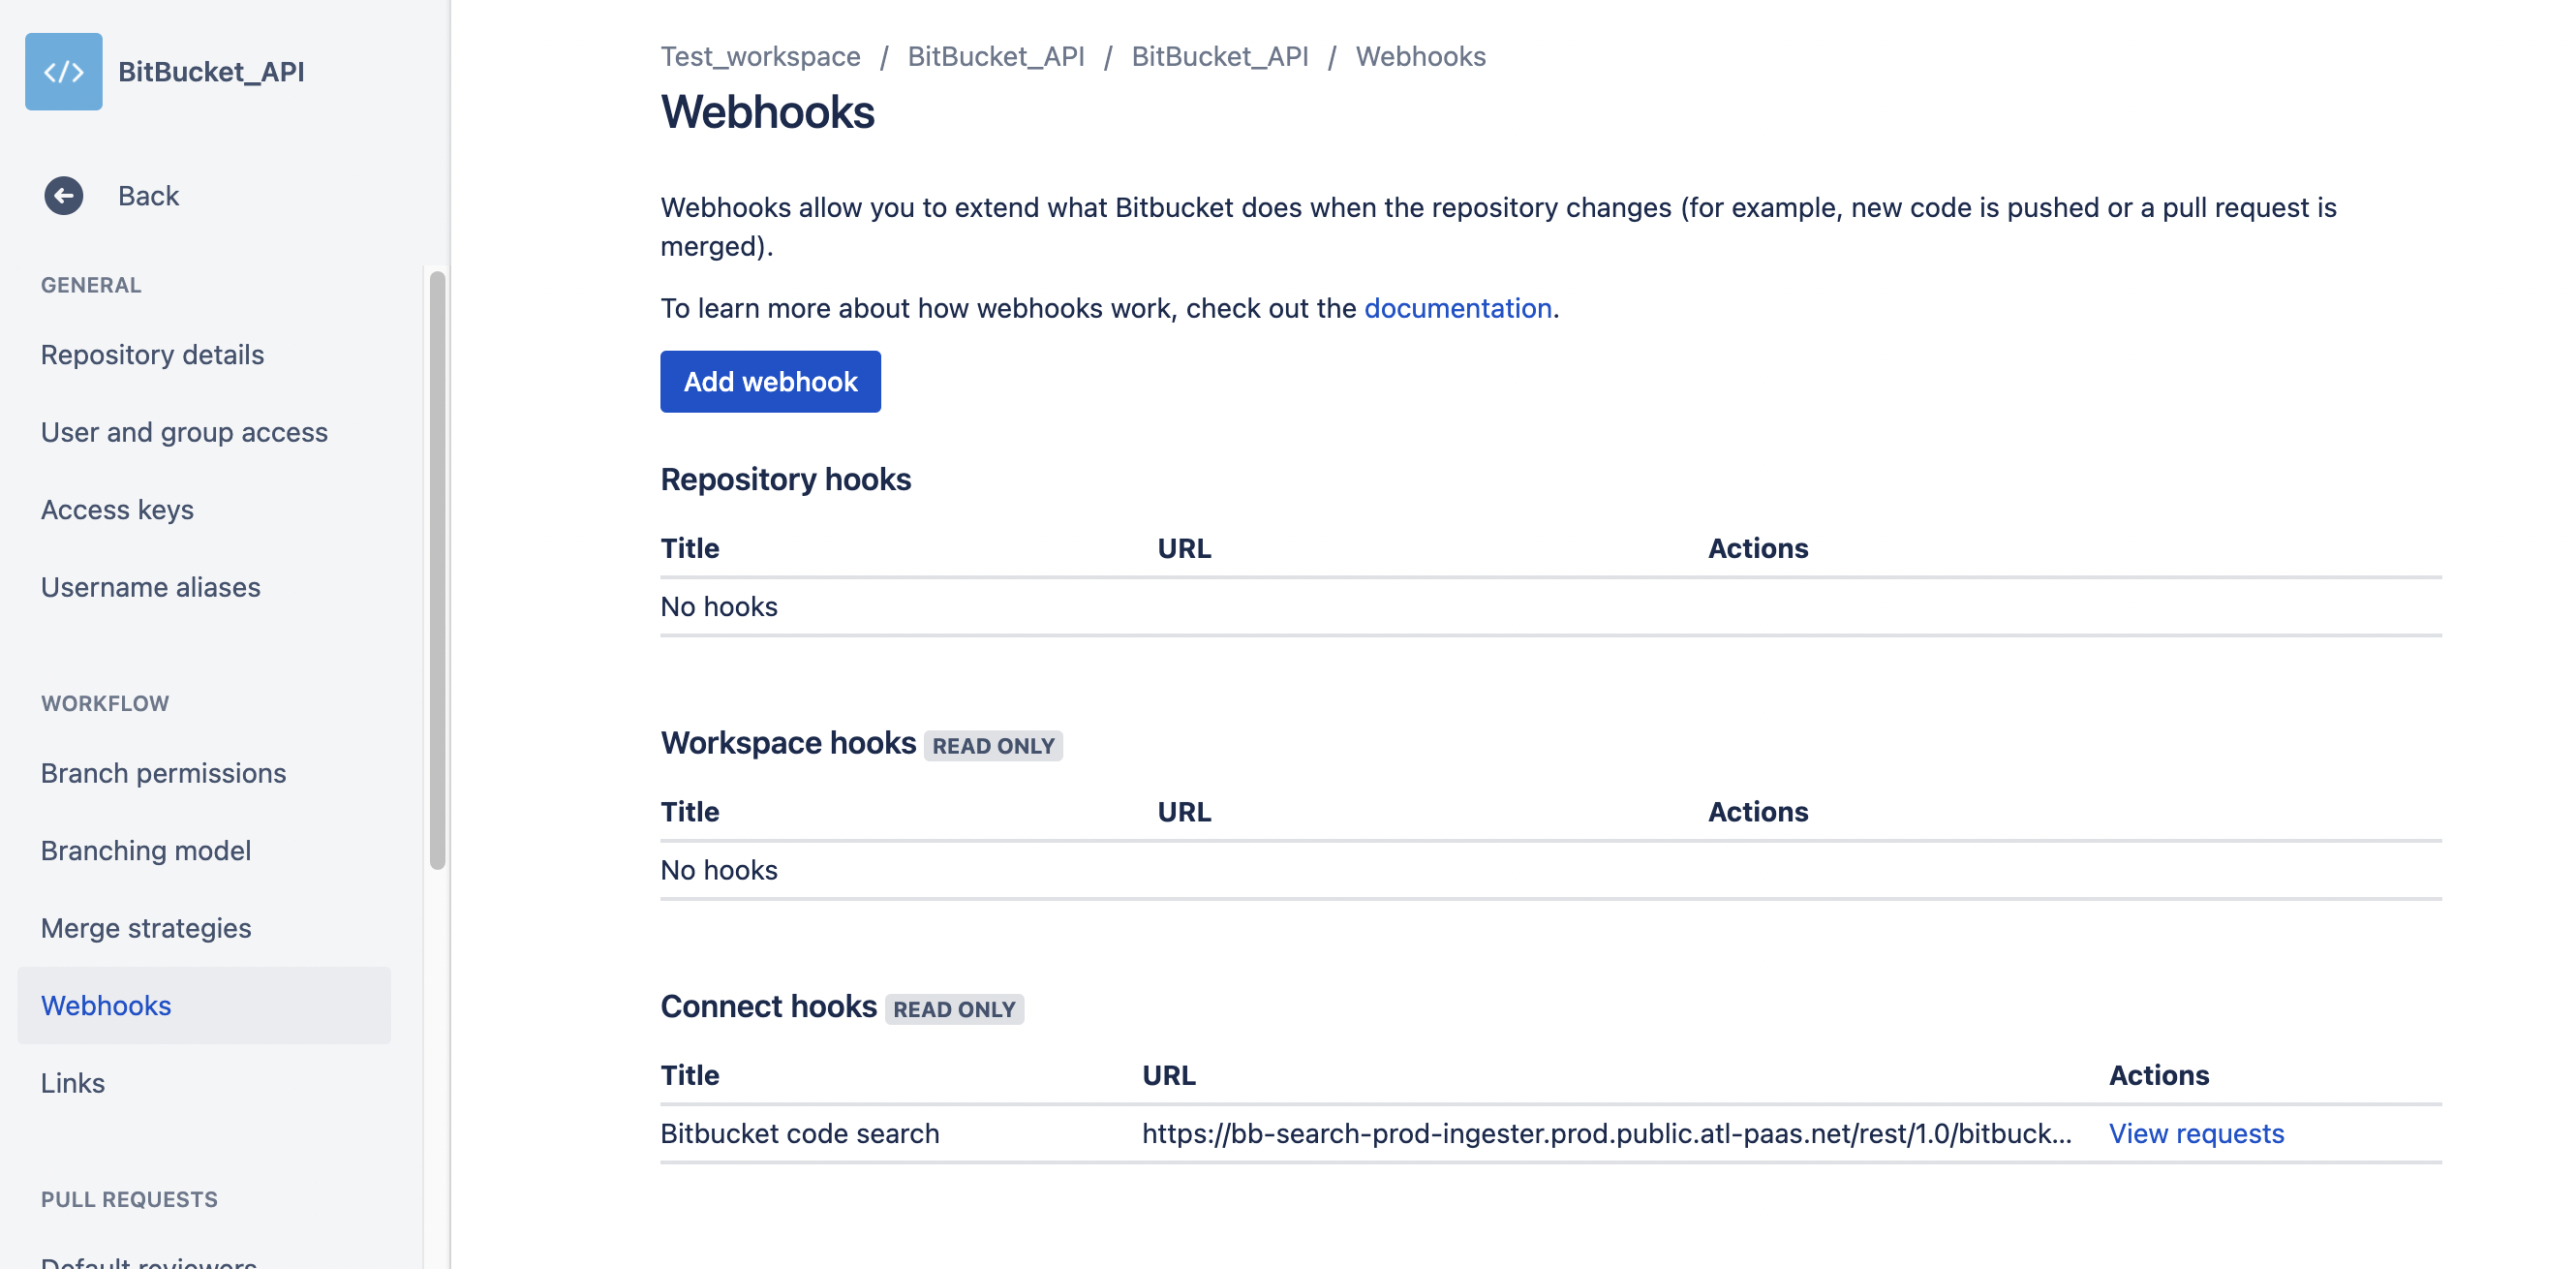
Click on Add Webhook and you should see the following page:
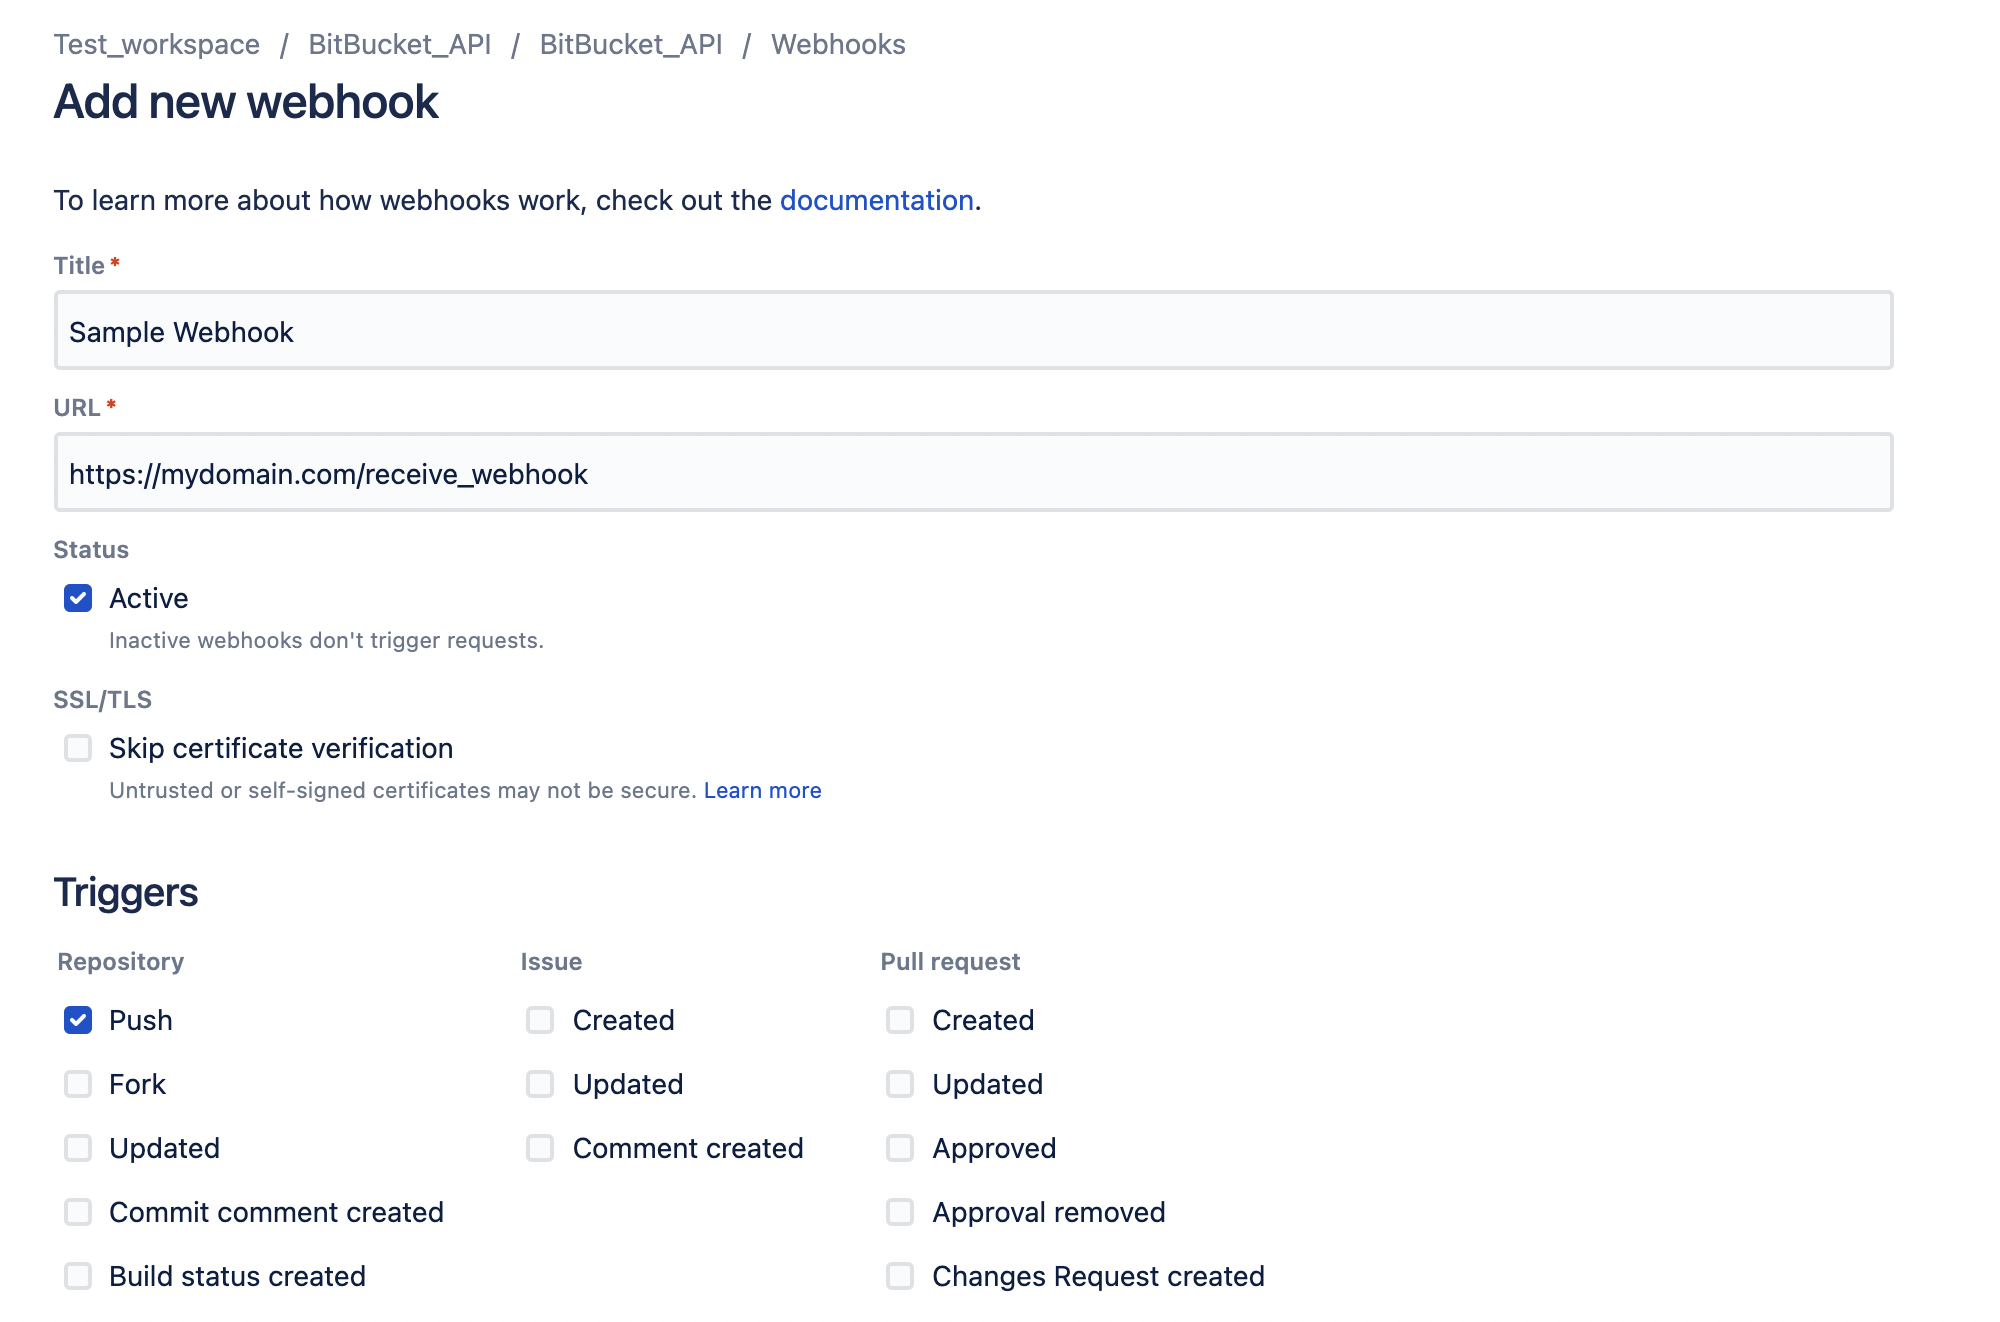
Select the list of triggers.
The URL must be HTTPS and not your localhost URL. For a quick solution, use expose.sh to get a temporary live, public URL.
In the above webhook, `Push` is selected as a trigger. When code is pushed to the repo, a request will be made to https://mydomain.com/receive_webhook.
Common API Tasks
Ensure you have set the correct scope/permission. All the below examples will be using basic authentication.
The API requests to `/teams` and `users/`, except `/users/{selected_user}`, have been deprecated. But you can make requests to `/workspaces` and `repositories` to work with users and teams.
Pass the following query parameters to the endpoints:
q - query string to filter repos

sort - to sort repos
List Your Workspaces
request.get(

    `${URL_PREFIX}/workspaces`,

    {

        headers: headers

    },

    (err, res, body) => {

        JSON.parse(body).values.map(

            workspace => {

                console.log(workspace.slug)

                console.log(workspace.uuid)

            }

        )

    }

);
This will list all the workspace names and their universally unique identifiers (UUIDs).
List Your Repos
The below code prints the UUID of your repos.
request.get(

    `${URL_PREFIX}/repositories`,

    {

        headers: headers

    },

    (err, res, body) => {

        JSON.parse(body).values.map(repo => console.log(repo.uuid))

    }

);
Create a Repo
To create a repo, you will need the workspace name (slug). You can also replace it with the workspace ID. The workspace ID must be inside curly brackets ({ }).
const workspaceSlug = 'testworkspaceapi';

const repoSlug = 'newtestrepo';

request.post(

    {

        url:

            `${URL_PREFIX}/repositories/${workspaceSlug}/${repoSlug}`,

        headers: headers,

        form: {}

    },

    (err, res, body) => {

        console.log(res)

    }

);
Below is a screenshot of the new repo:

If you have the workspace slug and the repo slug, you can make a GET request and get information about the repo. To learn more about the data you can pass while making the POST request, read here.
Get a List of Users and Roles
The below prints the users’ names and their roles in a workspace.
const workspaceSlug = 'testworkspaceapi';

request.get(

    {

        url: `${URL_PREFIX}/workspaces/${workspaceSlug}/permissions`,

        headers: headers,

    },

    (err, res, body) => {

        JSON.parse(body).values.map(

            permission => {

                console.log(permission.user.nickname)

                console.log(permission.permission)

            }

        )

    }

);
You can also add `/repositories` or `/repositories/{repository slug}` to the endpoint to get a repository’s users. Learn more about doing that here.
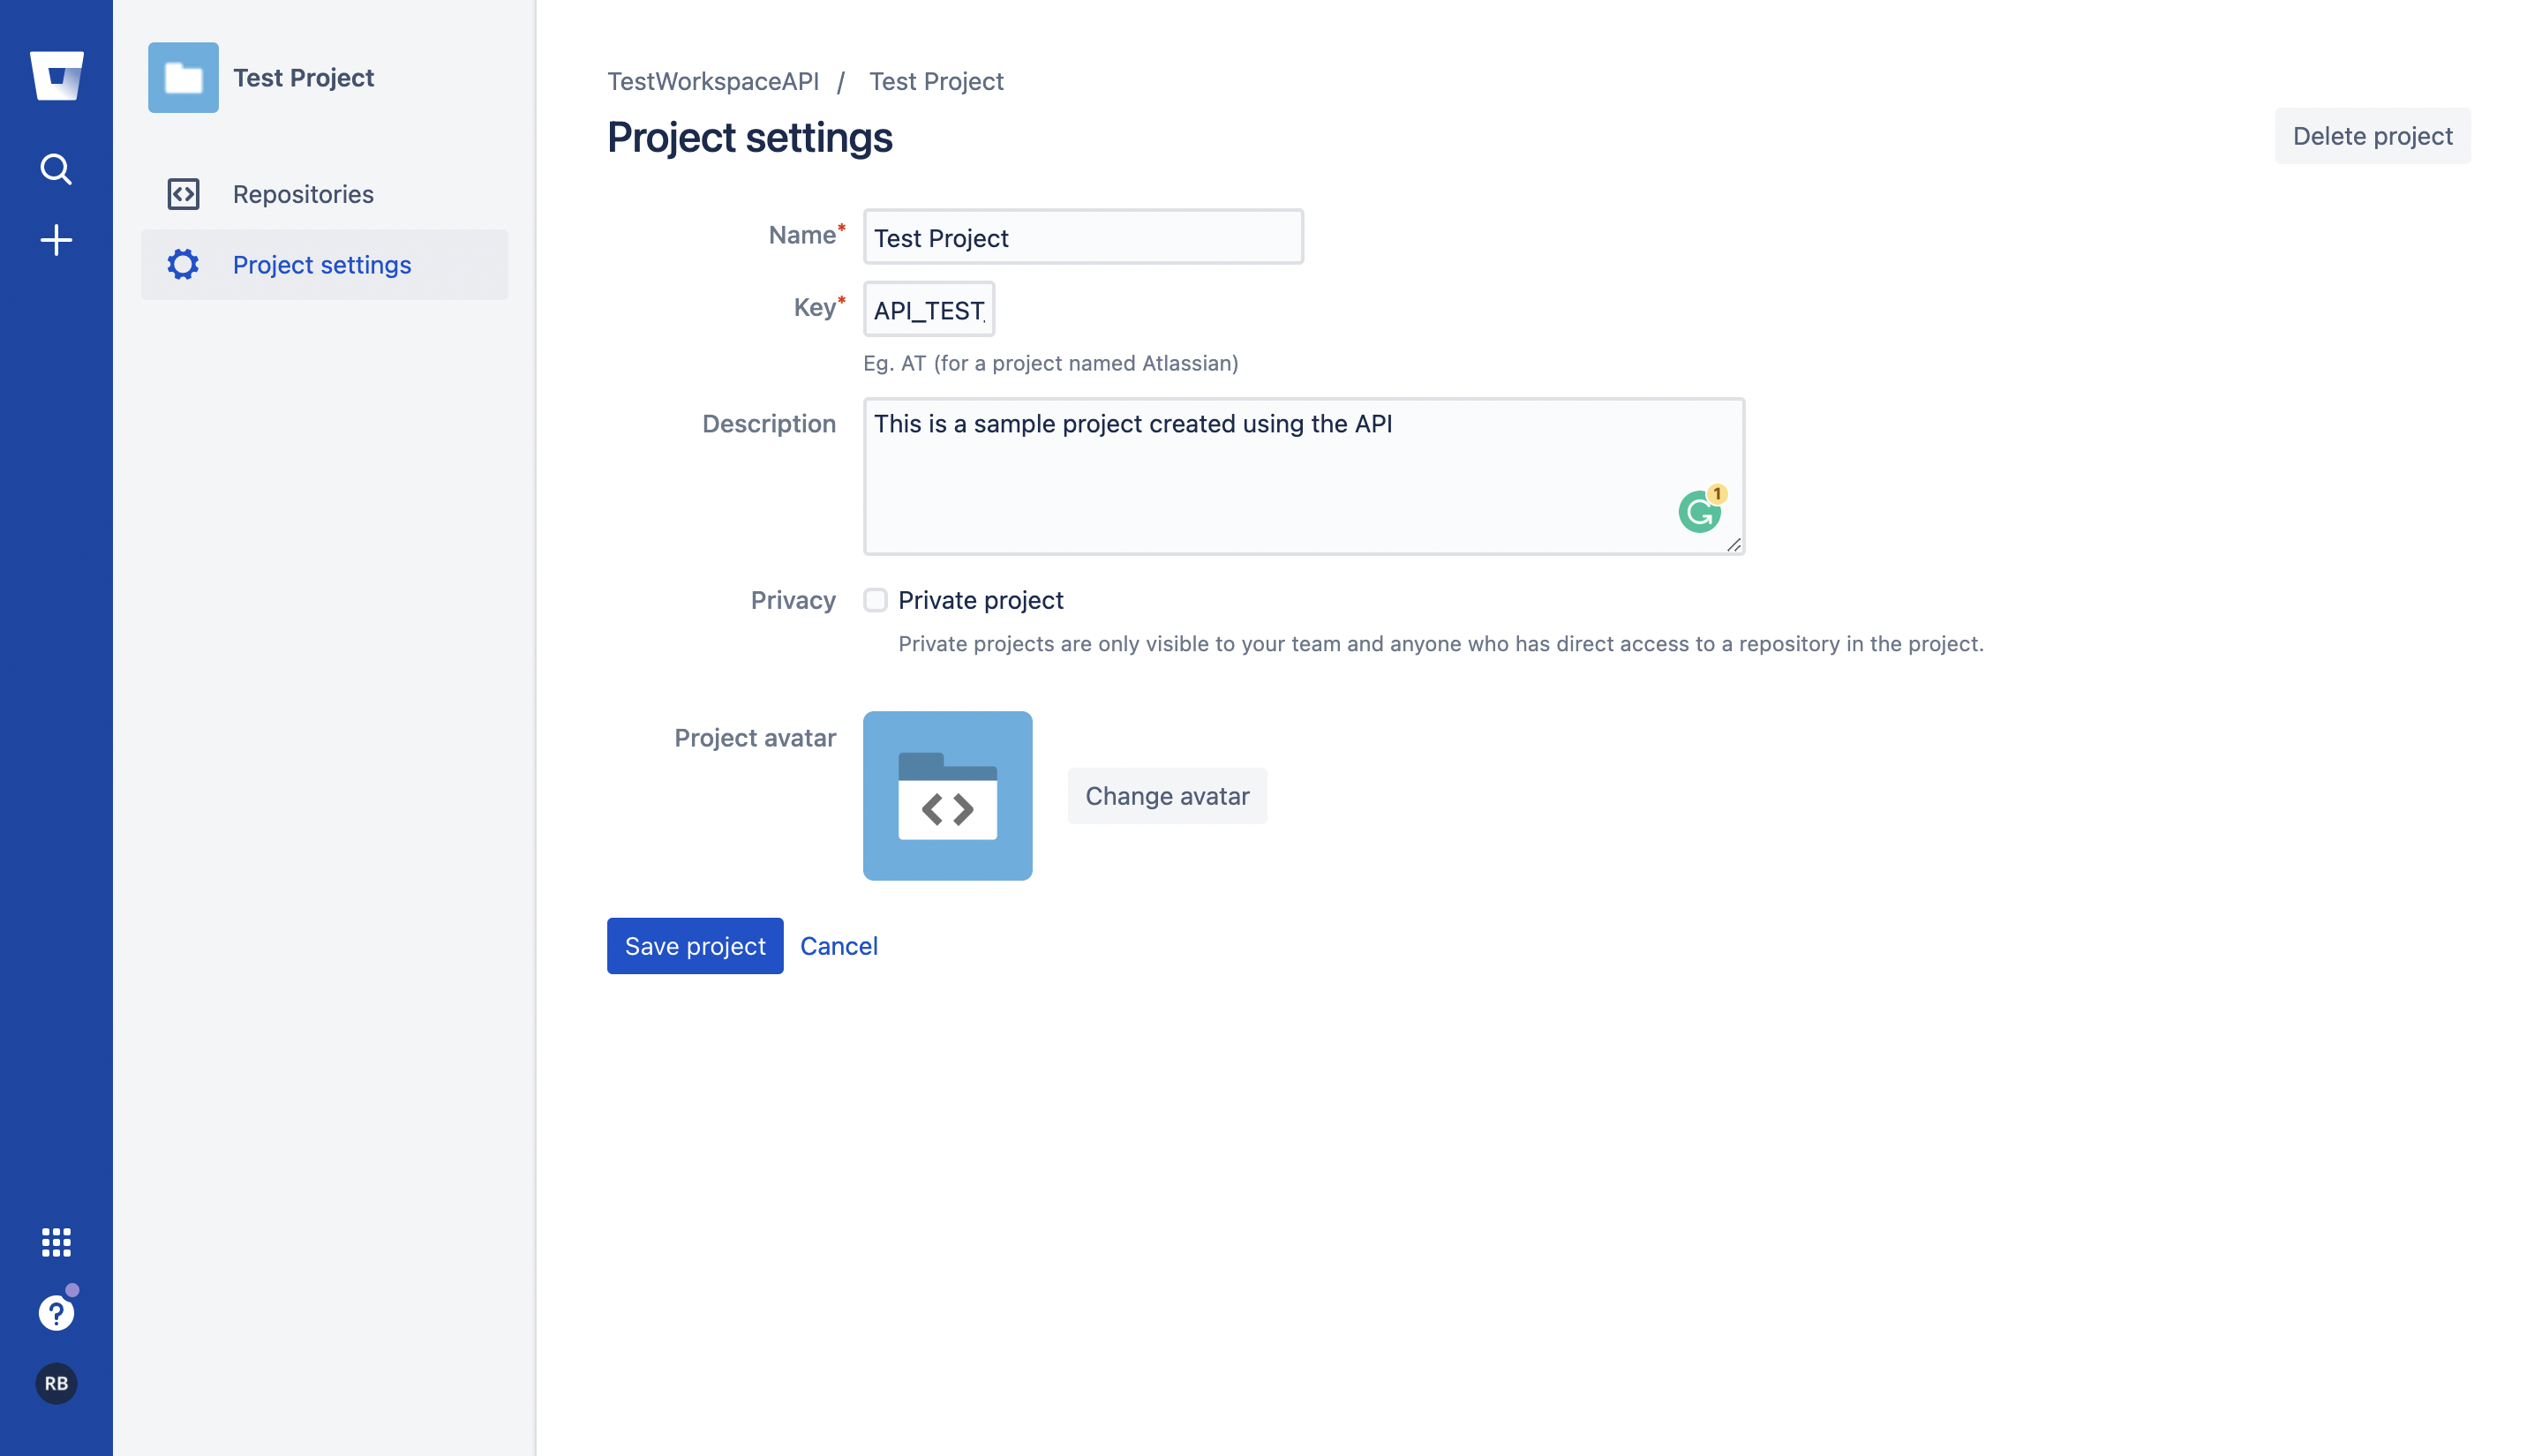
Create a Project
Use this to create a new project:
const workspaceSlug = 'testworkspaceapi';

request.post(

    {

        url: `${URL_PREFIX}/workspaces/${workspaceSlug}/projects`,

        headers: headers,

        form: {

            "name": "Test Project",

            "key": "API_TEST_11",

            "description": "This is a sample project created using the API"

        }

    },

    (err, res, body) => {

        console.log(body)

    }

);
It should look like this:
You can also manage commits, pull requests, issues, and other tasks. Check the documentation for details about the other endpoints.
Backing Up Your Repository
You might want backups of your source code. Although Bitbucket has its benefits, there are situations in which you could lose your data:
- Your account is deleted.
- The history of a repository is changed with git-reset or git-rebase, causing a forced push and data loss.
- A project is accidentally deleted from Bitbucket.
A backup keeps your source code secure and reduces the chances of downtime.
Rewind quickly automates your backup process and will soon be available for Bitbucket. It saves your repository and metadata daily. If needed, you can also download a repository or restore a lost repository in minutes.
You can sign up for Rewind Backups for Bitbucket starting today. To start backing up your Bitbucket repositories, you can find us in the Atlassian Marketplace.
Conclusion
Bitbucket can be an essential tool to automate authentication, integration, and other tasks for your Git repository. The API helps you streamline your workflow and maintain high-quality code.
To further improve your workflow, consider backing up your repositories with Rewind. With Rewind, you won’t have to worry about losing your repository or metadata, and you’ll have a daily backup available whenever you need it.
 Rahul Banerjee">